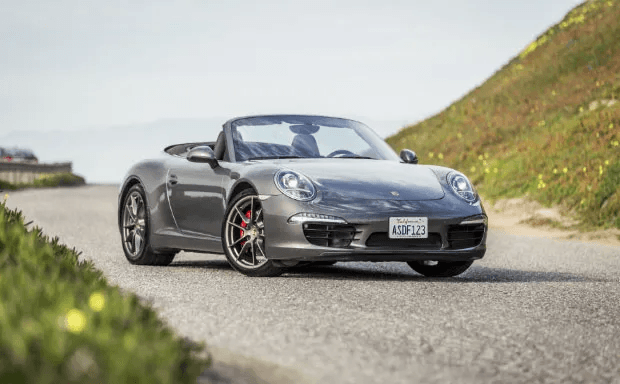
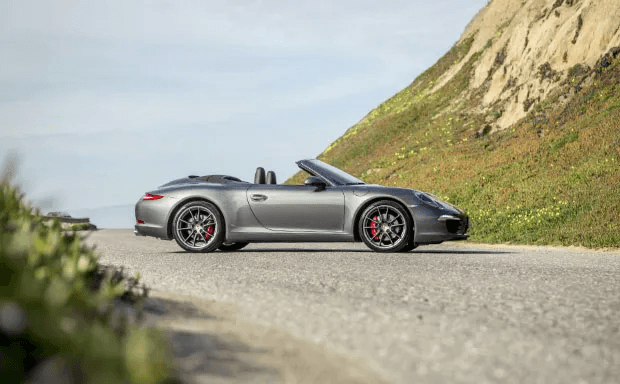
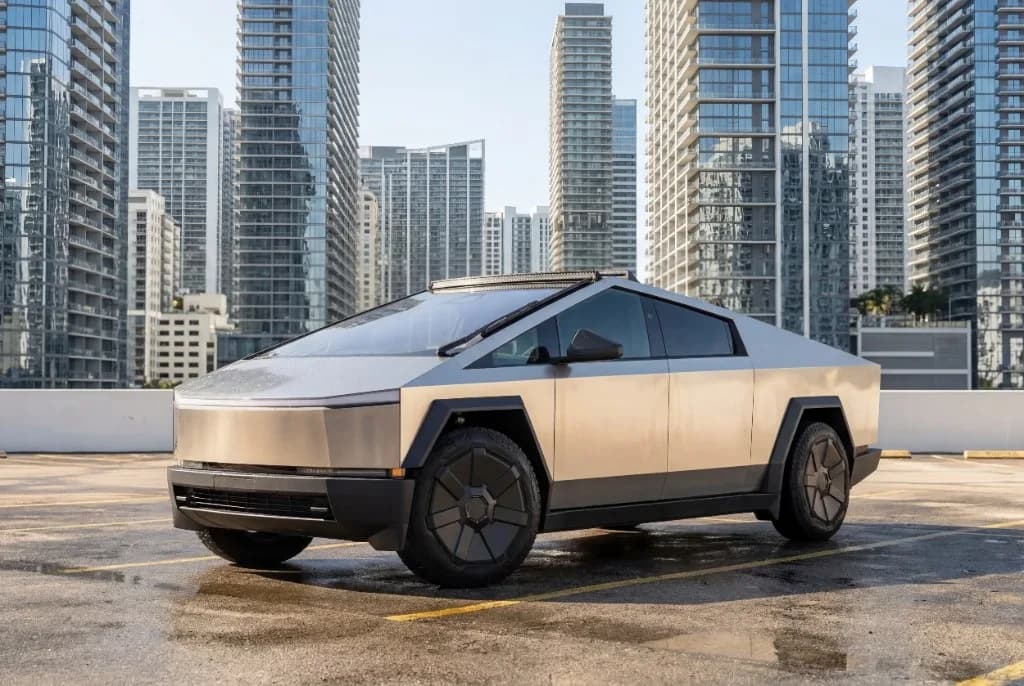
Turo hosts

12-point Turo listing photo checklist for hosts

A practical Turo listing photo checklist based on Turo's official guide: hero shot, 10+ angles, crop buffer, interior coverage, and gallery order before you upload.

Last updated

Jump to the guide

Follow Turo's official angles before you worry about editing

Turo's listing photos guide asks hosts to walk around the vehicle and capture at least 10 photos covering interior and exterior angles, with clear well-lit shots and no stock photography.

This checklist mirrors that official order so you can shoot once, pick a hero image with enough crop buffer, and upload a gallery guests can scan quickly on mobile.

Listing photos are different from trip documentation photos. This checklist is for the images guests see in search—not for pre-trip condition evidence.

  • Shoot the hero first—it drives your search thumbnail
  • Step back five paces: Turo crops ~20% on upload
  • Cover all 12 suggested angles when possible
  • Use morning or evening light when you can

Pre-shoot checklist (5 minutes)

Do this before you open the camera app.

  1. 1

    Clean inside and out

    Turo's guides assume a presentable vehicle. Trash, dash dust, and muddy wheels show up at thumbnail size.

  2. 2

    Pick soft light

    Morning or evening beats harsh midday shadows under the body and blown windshield highlights.

  3. 3

    Scout a clean background

    Open pavement, quiet street, or uncluttered scenery—guests should see your car first.

  4. 4

    Charge your phone and wipe the lens

    Blurry heroes are one of the fastest ways to lose listing opens.

Capture checklist (official angle order)

Mirror Turo's listing photos guide—check off each frame before you edit anything.

  • 1Front hero with crop buffer on all sides
  • 2Front quarter and rear quarter exterior angles
  • 3Passenger and driver side profiles
  • 4Driver-door entry and dashboard close-up
  • 5Front seats, rear seats, and trunk open
  • 6Dashboard view from back seats for cabin layout
  • 7Separate photos for Extras you list (racks, child seats, camp gear)

Upload-ready vs needs a reshoot

Do this

  • Full car visible with empty space around bumpers and wheels
  • Sharp focus and even exposure on exterior panels
  • Same lighting style across the exterior set
  • Real photos of your listing vehicle—not stock or dealer art

Avoid this

  • Hero cropped tight because you stood too close
  • Dark garage shots mixed with bright outdoor angles
  • Blurry interior or heavy windshield glare on the dash
  • Watermarked dealer photos or AI-generated vehicle imagery

Listing photos ≠ trip documentation

This checklist is for guest-facing gallery images in search. Pre-trip condition photos for claims are a separate workflow—do not mix the two sets.

Photo guide

Official Turo listing photo angles

Walk around the vehicle in this order. Images match Turo's public photo guide.

Front (hero)

Your search thumbnail and the first frame guests see. Turo crops uploaded images by about 20%, so step back and keep the full car inside the frame with empty space on every side.

  • Shoot landscape (horizontal) so the car fills the frame without vertical letterboxing.
  • Center the vehicle and leave crop buffer around bumpers, wheels, and roofline.
  • Use the same car, lighting, and location style you will use for the rest of the gallery.
Turo listing photo angle: front hero shot

Front quarter

Three-quarter front angle showing hood, grille, and one side. Turo's photography tips recommend lining body lines parallel to the frame instead of shooting at a skewed angle.

  • Stand slightly off-center so both front and passenger or driver side read clearly.
  • Keep the full car visible—this angle is often cropped too tight on upload.
  • Match distance and height to your other exterior shots for a consistent set.
Turo listing photo angle: front three-quarter

Passenger side

Full passenger-side profile. Guests use side shots to judge dents, paint, and overall condition before they book.

  • Shoot at eye level or slightly above—avoid extreme low angles that distort the body.
  • Park on level ground so the car does not look tilted in the frame.
  • Pick a background with minimal clutter so scratches and color read clearly.
Turo listing photo angle: passenger side

Rear

Straight rear view completing the 360° exterior walk-around. Include taillights, bumper, and any roof spoiler or rack your listing mentions.

  • Step back enough that the full rear—including lower bumper—stays inside the safe zone.
  • Avoid shooting into direct sun that blows out taillight detail.
  • If you have a hitch or tow hook, remember Turo restricts towing imagery in listing photos.
Turo listing photo angle: rear

Rear quarter

Three-quarter rear angle pairing with the front quarter. Together they show stance, wheels, and rear-quarter panel condition.

  • Mirror the front-quarter distance so both three-quarter shots feel like one session.
  • Show both rear and one full side without cutting off the roof or wheels.
  • Use softer morning or evening light to avoid harsh shadows under the rear bumper.
Turo listing photo angle: rear three-quarter

Driver side

Full driver-side profile. Many hosts mirror the passenger-side framing so guests can compare both sides for symmetry and wear.

  • Use the same background type as the passenger side when possible.
  • Check for reflections in windows that hide interior detail.
  • Capture door handles, mirrors, and wheel condition in sharp focus.
Turo listing photo angle: driver side

From driver's door

Interior entry view from the driver-side door. Sets expectations for cabin access, seat wear, and overall cleanliness before booking.

  • Open the door wide enough to show the sill and first step into the car.
  • Remove personal items, trash, and loose cables from the footwell.
  • Shoot in daylight or with interior lights on so fabric and plastics read clearly.
Turo listing photo angle: view from driver side door

Dashboard close-up

Clear dashboard and steering wheel. Guests look here for tech features, mileage presentation, and general upkeep.

  • Wipe dust off the dash and steering wheel before shooting.
  • Avoid heavy windshield glare—shift angle slightly or shoot in open shade.
  • Include infotainment and climate controls if they are selling points on your trim.
Turo listing photo angle: dashboard close-up

Front seats

Front seat area showing bolsters, material, and adjustment range. Answers common questions about comfort and wear early in the gallery.

  • Straighten seat backs and headrests for a tidy presentation.
  • Photograph heated, ventilated, or leather surfaces if your listing highlights them.
  • Use even interior light—mixed sun patches make wear look worse than it is.
Turo listing photo angle: front seats

Dashboard from back seats

Rear perspective toward the front cabin. Helps guests read layout, screen size, and front-seat legroom at a glance.

  • Shoot from the center of the rear bench for a balanced view.
  • Include rear air vents or USB ports if your vehicle has them.
  • Keep the same cleanliness standard as your other interior frames.
Turo listing photo angle: dashboard from back seats

Back seats

Rear seating area for families and luggage planning. Turo recommends interior coverage as part of the minimum 10-photo gallery.

  • Fold seats flat briefly if your listing mentions cargo flexibility—then shoot upright too.
  • Show ISOFIX anchors or child-seat fit if you market to families.
  • Match the lighting style used in front-seat and dashboard shots.
Turo listing photo angle: back seats

Trunk

Cargo area with the trunk or hatch open. Include separate Extras photos if your listing offers gear—Turo's guide calls this out explicitly.

  • Remove clutter so capacity is obvious; an empty trunk often reads larger.
  • Photograph included accessories (roof box, stroller, camp kit) in their own frames.
  • Note pre-existing scratches or stains honestly—transparency reduces trip disputes.
Turo listing photo angle: trunk

Data points

Quick rules from Turo's guides

Minimum gallery

At least 10 photos

Turo recommends walking around the vehicle and capturing interior and exterior angles.

Upload crop

About 20% cropped

Take five steps back so bumpers and wheels stay visible after upload.

Best light

Morning or evening

Turo suggests softer light instead of harsh midday shadows.

Prohibited

Stock & AI-generated

Turo's guide restricts stock photography and AI-generated or AI-altered listing images.

Before and after

Presentation cleanup on real photos

Hero readability

Same real car—a cleaner scene and stronger light help the thumbnail read at phone size.

ImprovedImproved

Exterior angle reference

Front three-quarter angle from Turo's suggested shot list.

Turo front three-quarter angle example

Free Turo listing photo checklist

Get the checklist in your inbox and use it before you refresh your next Turo gallery.

FAQs

Common questions

Where is the Turo listing photo checklist?

This page is the full checklist. You can also download the free PDF from the banner below or follow the complete Turo photo guide for every official angle with reference images.

How many photos should a Turo listing include?

Turo requires at least one listing photo but recommends at least 10 covering interior and exterior angles. You can add up to 20 photos per listing.

What is the Turo photo size or crop rule?

Turo crops roughly 20% off uploaded listing images. Take five steps back so bumpers, wheels, and roof edges stay visible in search thumbnails.

Should I edit photos before uploading to Turo?

Many hosts improve backgrounds and lighting on real photos, but Turo's guide prohibits stock photography and AI-generated or AI-altered listing images. Review Turo's current rules and only upload photos that accurately show your vehicle.

What is the fastest way to refresh a Turo gallery?

Start from your best real photos, confirm the hero has crop buffer, then improve scene and lighting consistency across angles instead of reshooting when the car has not changed.

After you shoot

Clean up listing photos without a reshoot

Shoturo is built by a Turo host for background cleanup, lighting, and crop-safe exports.

4.7 - Trusted by regular Turo hosts

Hosts who wondered if their photos were costing bookings

Better photos make people click. Shoturo helped CAR-GA Management refresh our Turo listings with cleaner, more premium images, improving click-through and helping turn more views into bookings.

Carlos
Turo host · CAR-GA Management LLC, Miami

We run multiple vehicles and consistency is everything. Shoturo helped Shaddai Car Rental standardize our listing photos fast, and we saw stronger listing views within the first week.

I used to wait days for a photographer. Now I upload at night and wake up with pro photos. My listings get more views.

Scheduling photographers was the worst. Cancel, reschedule, wait. Shoturo: upload, pick Miami, done. Bookings are up.

A
Turo host, Miami

My car photos used to look like everyone else's—driveway, parking lot. Now they stand out. More trips, better rates.

Had to get new photos after a repair. Photographer wanted $200 and a week. Did it in Shoturo in 10 minutes.

Quick and easy. My car photos look professional now. More views, more bookings.

Luis
Turo host, Orlando

My Model Y needed stronger listing photos on Turo. I uploaded in Shoturo and had clean, pro-looking shots the same day—no photoshoot.

Start creating

Find out if your Turo photos are costing you bookings

Clean up cluttered driveways, fix flat lighting, upgrade your hero shot, and make your listing look cared-for—all on your real car photos, in minutes.